August 26, 2011

Ramadan # 7 Lemony Fruit Salad Ice Pops


Today marks the last Friday and the 27th night of Ramadan. I feel like I'm about to say good by to a close friend who is leaving in a few days time and will not return for another year. And who knows what will happen in a year's time...who will be here and who will have departed. :o(  Let's all try to make the best of the time we have left with this blessed month.

------------------------------------------------------------------------------------------------------------
The summer is winding down and school will be beginning (or has already started in some places) very shortly. It would be around this time that I, along with my teacher friends, would be opening up boxes and setting up our classrooms for another school year. This would also be the time for last minute weekend getaways, parties, trips to the CNE and of course eating lots of ice cream and popsicles!

I have been noticing that some food trends from the 80s and 90s are making a come back, one of them being making homemade popsicles with plastic molds.  I remember when we were selling my parents' home, my mom and I had come across some plastic popsicle molds in one of the boxes and we decided to donate them- now I wish I had kept them because it would have saved me from spending $15 bucks on new molds. Oh well....

This recipe (from the Everyday Food Special Issue) I'm going to share with you is full of sweet and delicious seasonal fruit and tangy lemonade. I cut the recipe in half from 8 popsicles to 4.

Lemony Fruit Salad Ice Pops


1 ripe peach, washed and cut into 1/2-inch slices
1 golden kiwi, washed, peeled and sliced into 1/4 inch rounds
1/4 cup of blueberries, washed
1 frozen lemonade concentrate (the recipe used apple juice)

Follow the instructions on the frozen lemonade concentrate to make lemonade.  Arrange some fruit into 4 3-ounce ice-pop molds, making sure that the pieces fit snugly.  Pour enough lemonade into the molds to just cover the fruit.  Insert the ice-pop sticks and freeze for at least 6 hours.  To release the pops, run hot water over the frozen molds until it releases.


August 22, 2011

Ramadan # 6 Pizza, let me count the ways how I love thee!

O Lord, I seek Your forgiveness for every sin that I reproached or condemned one of Your creation for committing but then myself plunged into and brazenly committed before You.

I cannot believe we are into the final 10 days of Ramadan! Where did the month go?  Is it just me, or is time slipping by WAY TOO FAST!?  It seems like last week summer started, and then Ramadan came and now both are leaving us very shortly. *sigh*


To mark the last 10 days of Ramadan, Muslims are spending their days and nights in prayer, reflection, and remembrance of God. Since, many of us are staying out of the kitchen to focus on these activities, I wanted to share with you a simple recipe that won't take up too much of your time. Put aside the stews and curries, and bring on the pizza!

To put it simply, I love pizza! And I love making it at home! Depending on my mood, I get to experiment with different combinations of meats, spices, cheeses and vegetables that tantalize my taste buds. Ahh...my mouth is watering just thinking about that doughy goodness!

This recipe calls for freshly mixed pizza dough that should (if you want to read about my inability to find pizza dough in Pasadena, click here!) be available in your grocery store's bakery.  None of that pre-baked, cardboard-like pizza crust, okay?!

The base of my pizza is a meat sauce.  I either cook lean ground beef on the stove or use my dum keema recipe, and add a canned tomato sauce. I usually use Hunt's roasted red pepper or garlic tomato sauce.  I add some more spices- salt, chili flakes and sometimes some ground coriander.

The rest of the toppings consist of a variety of vegetables, sun dried tomatoes, jarred olives and hot peppers, and cheese!


Whole Wheat Pizza


1 pre-mixed whole wheat pizza dough, or you can make your own if you wish
1 large Hot House tomato, washed and sliced into circles
1 medium yellow onion, peeled and sliced
10 cremini mushrooms, washed and sliced
1 green pepper, washed and sliced into strips
1 red pepper, washed and cut into strips
handful of sliced and pitted green olives
handful of hot peppers
a few pieces of sun dried tomatoes, drained of oil
1 to 1 1/2 cups of shredded cheddar cheese
prepared meat sauce
1 tsp of corn meal
1 tbsp olive oil

Preheat your oven to 400 degrees.

Follow the pre-mixed pizza dough thawing instructions as some require the dough to come up to room temperature in the bag before using.

Spread oil over a round pizza tray and sprinkle it with corn meal. Stretch the pizza dough over the tray, making sure that it is stretched evenly and the crust is even all the way around.  Layer on the meat sauce and then add the vegetables.  Sprinkle the shredded cheese on top of the pizza and place the tray into the centre of the oven for 20-30 minutes or until the bottom of the pizza is cooked.  I also like to check the centre of the pizza as sometimes it can become soggy. If you find that this is happening, leave it in for another 5-10 minutes.


August 15, 2011

Ramadan # 5 Dum Keema (Steamed Ground Beef)

Oh Allah, please accept our fasts, prayers, and acts of charity during this blessed month.

Today is the 15th fast of Ramadan- the halfway point. I cannot believe how quickly this month is flying by.  The days are long and at times challenging, but well worth it.  The physical and spiritual detoxification that is occurring is necessary to remove the build up of toxins from our bodies and hearts.  It is my hope that this detox doesn't end with Ramadan, but continues throughout the year in some way.

Creating meals for your families while fasting can be a challenge because you can't taste anything to check for spice and flavour.  As a result, I have started cooking after iftar (after I break my fast at sunset).  I don't want to be slaving over the stove for a long time because I need to go to the mosque to pray taraweeh, so I like to make meals or parts of meals that are easy and quick to prepare.   

Dum keema is very versatile. It can be eaten by itself, put into sandwiches, tacos, pasta dishes or on pizza.  It is very easy to prepare and uses ingredients that you probably already have at home or can easily purchase at your grocery store.

Dum Keema


3 heaping tbsp chicken tikka masala spice
pinch of salt
1 cup low fat, organic yogurt
1 heaping tbsp each, freshly minced ginger and garlic
6 tbsp fried onions (these onions come prepackaged and are available at Indian grocery stores and the Indian section at No Frills or Loblaws)
2 lb lean ground beef, washed in a mesh sieve and drained
red chili flakes (optional)
diced tomatoes and fried onions for garnish


Preheat oven to 350 degrees.

In a medium-large bowl, mix together chicken tikka masala, yogurt, salt, garlic, ginger, and fried onions. Add in the ground beef and using your hand (or a spoon if you don't want to touch the meat), thoroughly mix together the yogurt-based masala and meat.  Once mixed, pat the meat down into a roasting pan (the pan should have a lid) into a thin layer.  Place the pan with the lid on, into the oven.  Let the meat "steam" for 15-20 minutes before taking the lid off to stir the meat.  You will notice the meat will break into big chunks, using a wooden spoon, break these chunks into small pieces.  Replace the lid and let the meat cook for another 10-15 minutes or until the meat juices have disappeared.  

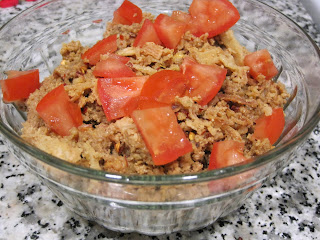
Place the dum keema into a glass dish and garnish with some friend onions, red chili flakes and diced tomatoes.

August 11, 2011

Ramadan # 4 Green and Gold Kiwifruit Salsa

O Allah, I seek your forgiveness for every sin that my soul made seem to me trivial and small, and continued to make seem insignificant, until it finally entangled me in it.
While entering the grocery store last week, I came across a stand displaying gold kiwifruit.  What attracted me to the stand wasn't the actual fruit, but the freebies sticking out of a pocket below! Inside the pocket were these plastic wrapped green spoons/knives with the words "Cut and scoop" on them.  After closer examination, I discovered that the green spoons/knives were for the kiwifruit. Normally I use a regular knife to peel my kiwifruit and eat it. But this spoon/knife was taking me in another direction.  The knife side is used to cut the kiwifruit in half and the spoon side is used to spoon out the kiwifruit so that you are left with a kiwi skin cup. Pretty neat eh?

Anyhow, I stuck a couple of those spoon-knife packets into my purse and continued to explore the stand.  I pulled off a recipe card (from Zespri Kiwifruit) for green and gold kiwifruit salsa. I was hesitant in trying the recipe out because I had never before tried gold kiwifruit. After a few minutes of deliberation, I decided to go ahead and try it out.  I picked up all of the necessary ingredients, did the rest of my shopping and came home.  

I didn't make the salsa right away because the kiwis weren't that ripe. It actually worked out for me because I had to make an unexpected trip back home, so the kiwis had a few days to ripen on my kitchen counter.  

Some info on kiwifruit (came off the back of the recipe card): -

-Kiwifruit are ripe when they give in to slight pressure.
-Gold kiwifruit will last 3-7 days at room temperature and 12-14 days in the fridge.
-Green kiwifruit will last 3-7 days at room temperature and 24-28 days in the fridge.
-2 kiwifruit have less than 100 calories, more than 230% of your daily Vitamin C and 16% of your daily fiber.
-Kiwifruit also have calcium, iron, Vitamin E, zinc, folate, antioxidants, magnesium, and potassium.


Yesterday afternoon I made the salsa (with some minor alterations to the original recipe) and after R and I broke our fasts, we tried it with corn chips and I have to tell you it ROCKS!!!! Slightly sweet yet tart and oh so yummy!  

Some notes:  I used the spoon and knife utensil to create kiwi cups and it isn't as easy as it looks.  After I made a few cups, I went back to using my knife. I think I would only use the spoon and knife utensil if I wanted to serve the salsa in the cups.

Green and Gold Kiwifruit Salsa


3 Gold kiwifruit (Original recipe said 4)
3 Green kiwifruit (Original recipe said 4)
1/2 large red onion, peeled and finely diced (Original recipe said 1 cup of diced red onion. I cut up the halves and put them into a food processor to save myself time and tears)
2 tbsp fresh cilantro/coriander, washed and chopped
1 tbsp fresh mint, washed and julienned
juice of 3 small key limes (Original recipe said 1 tbsp fresh lime juice)
1 tbsp ground cumin

Slice kiwifruit into halves and peel or spoon out the fruit onto a cutting board. Dice kiwifruit into small cubes.
Put all of the ingredients into a bowl and mix gently. Refrigerate for 1 hour before serving so the flavours can blend together.  Serve with chips or as a side to chicken or fish (or in fish tacos!).


August 10, 2011

Ramadan # 3 Spinach and Almond Pesto with Fresh Mozzarella and Garlic Shrimp

O Allah, I seek your forgiveness for every sin that leaves grief in its wake, that causes remorse, that holds back sustenance, and that prevents acceptance of [my] prayers.

I really enjoy creating pasta-based concoctions in my kitchen. I usually stick with one type of pasta in my dishes, but lately I've been mixing different flour-based or vegetable-based pastas, trying to find combinations that work and that my family will eat.  One combination that I like is an equal blend of white and whole wheat pastas because you get the heartiness of the whole wheat pasta without having the dish become too heavy and dense.


A while back, I came across a blog post on pesto. The recipe was surprisingly easy and didn't require Parmesan cheese (it's hard to find Parmesan cheese without rennet in it). I tagged this recipe under "Recipes to Try ASAP" and let it be.  A couple of weeks ago, I came back to this recipe and thought I would test it out.   I changed the recipe by using almonds instead of walnuts, mixing up the pasta and adding fresh mozzarella and shrimp.


Spinach and Almond Pesto with Fresh Mozzarella and Garlic Shrimp
 

2 big handfuls of fresh baby spinach, stems removed and washed and dried
1/4 cup of almonds, skin removed
4 tbsp freshly minced garlic,
10 basil leaves, washed
4 tbsp olive oil
6 small fresh mozzarella balls, drained of liquid and sliced into quarters
15-20 frozen raw peeled and deveined shrimp, thawed and washed
1.5 cups dry whole wheat rotini pasta
1.5 cups dry white rotini pasta
salt and pepper to taste

In a food process,  mix together spinach, almonds,  3 tbsp garlic, 8 basil leaves, 2 tbsp olive oil, salt and pepper until a gritty-like texture is formed.  Taste for salt and pepper.  If a stronger flavour is desired, add more spinach, basil and almonds and give the mixture a spin in the processor.

In a frying pan, add the remaining olive oil, 1 tbsp of garlic and the 2 basil leaves (torn up into small pieces).  Saute on low-medium heat for 1 minute.  Add in the shrimp and cook until the shrimp have curled in a bit and are pink all the way through.  Season with some salt and pepper before removing from heat.

Cook the dry whole wheat and white pastas (SEPARATELY) according to box instructions.  Strain the water and mix the pasta in a large bowl with the pesto. Gently mix in the mozzarella quarters and shrimp. Taste the pasta for seasoning and add salt and pepper if necessary.  Drizzle a little bit of olive oil on top.  Serve immediately or refrigerate for a later time.


August 4, 2011

Ramadan # 2: Stuffed Puff Pastry

O Allah I seek Your forgiveness for every sin that kills the heart, and incites anxiety, and preoccupies the mind, and pleases Satan, and angers the All-Merciful
------------------------------------------------------------------------------------------------------------------


I truly believe that the grocery stores here in Pasadena are conspiring against me.  I have been looking high and low for freshly mixed bakery pizza dough since we followed R's work assignment from TO to Fairfax to LA  and to date I HAVEN'T found any!!!  It is in my humble opinion that when the grocery store clerks see me coming, they run quickly to the bakery section and remove the bagged pizza dough...lol. I've searched Ralph's, Fresh and Easy, and Target, but I have always come back empty handed.

Why don't you just make your own you ask? Well, there are a few things that intimidate me and working with yeast is one of them.  I've heard, or rather read, horror stories that involve yeast and I'm not sure if I want to have one of my own.  Isn't yeast temperamental?  It can't be old, has to be mixed with water at the correct temperature etc.  That's why I like using the freshly mixed pizza dough that's available at home in Toronto at Loblaws or Supercentre. The bakers mix it fresh in-house every few days and it isn't chock full of preservatives. They also have the option of white or whole wheat dough which is nice.

This Ramadan, I wanted to stay away from the samosas and make something different for iftar (the small snack(s) that is eaten to break the fast). I was thinking of small pizza pockets, but BECAUSE I couldn't find the dough anywhere, I opted for puff pastry. Pizza is a great meal and has the potential of being healthy if you select good ingredients. You can cover most, if not all of the food groups based on what you choose.  For me, I love having lean ground beef, tomatoes, onions, olives, jalapeno peppers, green peppers, and mushrooms on my pizza. I do like to add pineapple, but because most of my family don't like having the sweet and savory flavour, it's usually omitted from the pizza.


Since I wanted to make individual portions, I used pre-cut, 5"x5" puff pastry squares for the crust. For the filling I used dum keema (steamed ground beef-I'll post this recipe later), hot salsa, sliced tomatoes, low-fat shredded cheese, olives and onions.  I also made a vegetarian pizza pocket, using methi palak (cooked spinach with fenugreek).

People say that when you're making crepes, the first one is always bad, well I had a similar experience while trying to fold over my first pizza pocket.  I didn't know how to fold it and keep the filing inside, so I ended up having a really bad looking pocket with pieces of filling stuck to the edges.  After thinking about it for a few seconds, I had a Martha Stewart moment and tried using the tines of a fork. Success!  I now had a completely sealed pocket that looked pretty.

Puff Pastry Pizza Pocket 
(try saying that 5 times in a row!)

1 pack of pre-cut 5"x5" puff pastry squares, thawed as per package instructions
1 cup cooked dum keema (ground beef) or any cooked ground beef/chicken/turkey or 1 cup of cooked spinach  if you want to make vegetarian pizza pockets
1 cup shredded, low fat cheddar cheese
1 onion, thinly sliced
1 jar of hot salsa
a handful of sliced olives, drained
a handful of sliced yellow grape tomatoes, washed and dried
1 egg, beaten
1 tsp cold water

Pre-heat the oven to 350 degrees.**

Line a cookie sheet with parchment paper and set aside.

Place a sheet of parchment paper on your counter. This will be your work surface.  Lay one puff pastry square on the parchment. Place 1 tsp of salsa on the pastry and spread it out. Lay on 1 tablespoon of keema in the centre of your puff pastry square. Layer some cheese, a few slices of onion, olives and tomato slices on top of the keema. Sprinkle the filling with cheese.  Bring one corner of the puff pastry square and match it up with the corner diagonally across from it so that the square becomes a triangle.  Using the tines of a fork, press down gently to seal the puff pastry.  Using a spatula, carefully lift the pizza pocket and place it onto the parchment-lined cookie sheet.  Continue the same process until you have made all of your pizza pockets.

In a small bowl, beat 1 egg and 1 tsp of water together. Using a pastry brush, brush the top and sides of the pizza pockets with the egg wash. This will create a nice golden colour on your pizza pockets.

Put the cookie sheet into the 350 degree oven until the pastry is puffed up and golden brown.   Serve with ketchup or green chutney.

** If you don't want to make the pizza pockets right away, you can freeze them in a freezer bag layered between wax paper.  Skip the egg wash until you are ready to bake them.


August 2, 2011

Ramadan # 1: The Homemade Latte

 O Allah, I seek Your forgiveness for every sin that turns away from me Your mercy, or causes Your vengeance to befall me or deprives me of your generosity, or takes away from me Your blessings.
 -------------------------------------------------------------------------------------------------------------

So Ramadan has just begun and for the first few days it can be a challenge to wake up before sun rise, eat your suhoor (early breakfast) and go on with your day.  Some of you probably like to pick up a coffee or latte on your way to work or school, but that will have to be nixed for this month, or longer if you want to use Ramadan to help you get rid of your caffeine addiction!  For those of you who just can't give up the coffee how about making your own "latte" at home to enjoy before you start your day's fast?  You'll still get your caffeine kick and keep some money in your wallet.

My husband usually likes to have some caffeine in his system to help get his day started. Usually he would swing by Starbucks (in the US) to pick up a vanilla latte or a double-double from Tim Horton's (in Canada) on his way to work. However, for the past few weeks, I've been making these homemade lattes for him instead.  Now there will be no use of a coffee machine because, well we don't have one.  This latte is made with the Starbucks Via packs.  At first I would eye-ball the amounts of water, milk and instant espresso powder I used, but when my husband asked me how I made it, I knew I had to actually measure out the ingredients for future reference. 

Homemade Latte


1 cup filtered water
1 Starbucks Columbia Via pack
1/4 tsp instant espresso powder
1 1/4 cup 2% organic milk  (I added the extra 1/4 cup because the latte goes into a travel mug. You can get rid of it if you want)
2 1/2 tsp sugar (adjust the sugar to your taste)


In a small steel pot or sauce pan with a high rim, add your water and heat it up to a simmer over low-medium heat. Once the water begins to simmer add in the Starbucks Via pack and stir the mixture with a spoon.  Add the instant espresso powder and sugar. Bring the heat up to a medium and add in the milk. Start whisking the mixture as it begins to boil. Continue whisking until enough froth has been created. Remove from heat and pour into a large coffee mug or latte bowl and enjoy.